FAQS
Phone
How Do Conference Calls Work?
Conference calls work by having each participant call a ‘dial-in’ phone number and then type in an ‘access code’. Start an on-demand teleconference using the following steps:
- Copy and share your conference details, letting everyone know the date/time to join.
- Host: Call the preferred dial-in number.
- Enter Moderator PIN followed by the # key.
- Participants: Call the preferred dial-in number.
- Enter access code followed by the # key.
- Use the same call-in details for all future calls.
- No need to login to your account.
- Participants can join via web or phone and will all be connected in the same conference call.
How Do I Record My Conference?
- Call the dial-in number
- Enter your moderator PIN followed by the # key
(You can find your moderator PIN via ‘Dial-in information’) - Press *9 to begin recording
- Everyone will hear a message that the call is being recorded
(This is so that we adhere to privacy and GDPR regulations) - Press *9 again to stop/pause the recording at any point
- The recording will automatically end when your conference ends and an email with an mp3 download link and playback information will be sent to the host. The same details can be found in your account via the right-hand menu under ‘Recordings’ and also via ‘Past’ calls.
NOTE: Only hosts/moderators can initiate recording. More than one person can use the moderator PIN.
How To Conduct International Conferences
- Our service offers a selection of dial-in numbers around the world that are “in country”; callers would pay only their local fees to reach the conference line. There are also international Toll Free Numbers available to ensure that callers are not charged any fees.* To access these numbers, just log into your account, then on the main Conference page click “More” next to your assigned dial-in number. Here you will see a list of numbers. Provide these dial-in numbers to your international participants, along with the rest of the relevant call information. Those parties would dial in just like any other call participants, but using the international dial-in number assigned to their country (callers in countries not listed can dial into any of the US-based dial-in numbers, using their usual country calling codes).Add any of these numbers to your list of Primary Dial-in Numbers by going to Settings, typing in all or part of the country name, then highlighting that country and hitting Save. International numbers added to your account in this manner will automatically appear on any conference invitations you send through our site.*Additional per minute charges apply.
How Does Caller Display Work?
- Hosts can view the full caller number of participants who join via phone. You can also add contacts to your address book directly within your online meeting room during a conference.
- Add a name to your telephone participants so you know exactly who is in your meeting and who is talking.
- Save a contact phone number directly to your address book so you know exactly who is connecting in your conferences on future meetings.
- See the names of who was present in each meeting in the email summary.
- Search names using the ‘Smart Search’ feature in your account and see which meetings your contacts have attended (not available with every subscription).
*NOTE: Only moderators will be able to view full caller numbers and only moderators who are logged into their account (i.e. not someone who was made moderator by the host/organizer) will have the ability to edit contacts.
- Hosts can view the full caller number of participants who join via phone. You can also add contacts to your address book directly within your online meeting room during a conference.

How does it work?
- If you have already added phone numbers to contacts in your address book, as people join your conference via phone, you will be able to see their name displayed from what you already entered in your address book.
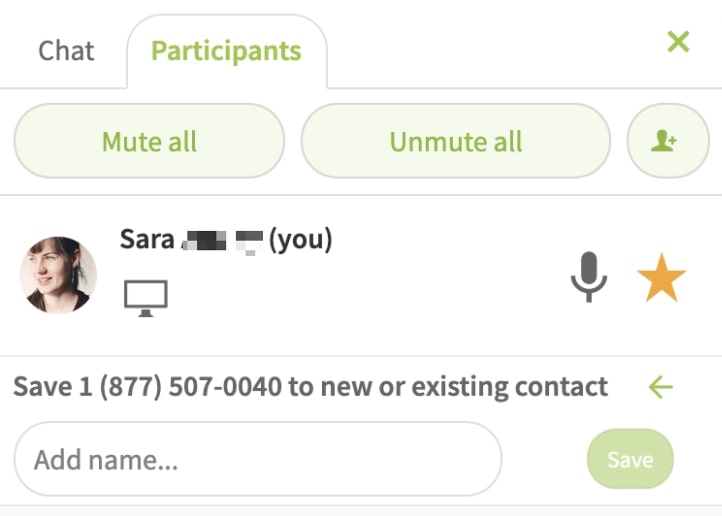
- While in the online meeting room as moderator, just open the participant list and click on the phone number of one of your attendees and you will be given the option to add a name to a new or existing contact in your address book. Hit ‘Save’ to confirm the changes.
- Phone participants will have a handset icon below their name or number and any web participants will have a computer icon below their names.
How Do Moderator Controls Work?
Telephone Conference Controls:
Available to all callers:
*2 Raise or lower your hand
*6 Mute or unmute your lineAvailable to call moderators only:
*5 Meeting Lock
*7 Toggle Mute Mode (see below for details)
*8 Toggle entry and exit chimes
*9 Start and stop recording
*0 End ConferenceAvailable Mute Modes:
Conversation Mode: Default mode where all participants may speak, mute or unmute themselves by pressing *6.
Q&A Mode: All participants are muted and have the ability to unmute themselves individually.
Presentation Mode: All participants are muted and can only be unmuted by the moderator.Set a default Mute Mode for all calls:
The default mute mode for all your calls can be set from within your account. Go to ‘Settings’ and then select ‘Moderator Add-On’ and click on your preferred default mute mode.
*Note that this new setting will only apply to calls that take place or are scheduled after you changed the setting. To change the default mute mode for calls already scheduled, you would need to cancel and re-schedule them to have the new setting applied to those calls.
Moderate the call from your computer:
If you would like to moderate your call from your computer, under the ‘FAQs’ section, you will find the article
‘How can I Manage my call Online?‘ which explains how you can manage your conference via the Online Meeting Room.
WEB
How Do I Schedule A Conference?
- Sign in to your account
- Use the link in your activation email
- Click SCHEDULE
- Click or tap on the large calendar icon on your account’s ‘homepage’.
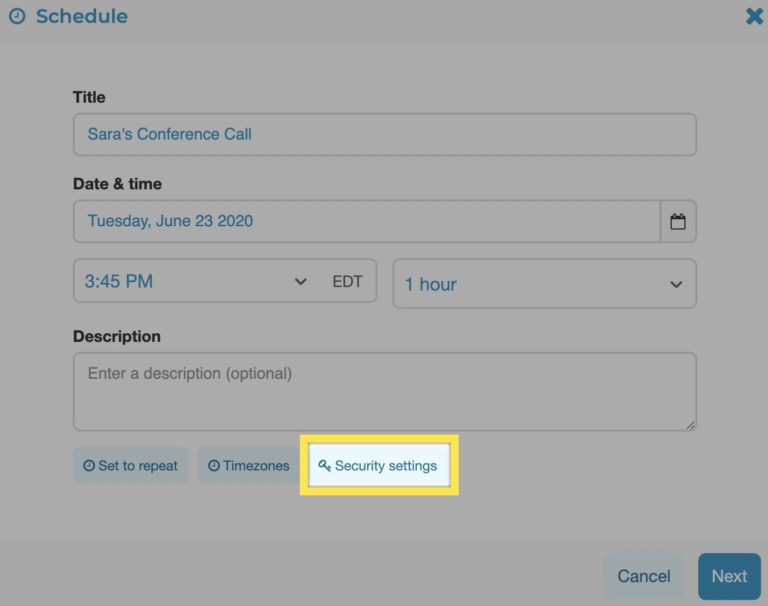
- Enter a Title for your meeting – this is optional, but is helpful for your participants and for yourself to find meetings back within your account using the search function.
- Choose a date, time and duration.
- Add an optional Description (Agenda) if required.
- Recording – set your conference to be automatically recorded.
- Transcription – have your meeting automatically transcribed by our AI bot ‘CUE’. Includes automatic topic tags and keyword search.
- Set up a Recurring Meeting by clicking on ‘Set to repeat’ with daily, weekly or monthly options.
- International participants? Just select Timezones on the first screen of the scheduling process, then click the plus sign to add another location. This will allow you to choose the best option for all invited parties.
- Security Settings: Create a randomly generated one-time access code unique to this conference call.
- Add PARTICIPANTS
- Choose DIAL-IN NUMBERS
- SUMMARY
- Once you have confirmed the details are correct, hit ‘Schedule’.
- You and all those added as participants will receive an email invitation with the access code for your account, along with all the details they need to join your conference.
- 15 minutes before the scheduled start time all invitees will also receive an automatic reminder email.
Can Participants Join An Online Meeting From An Iphone Or Ipad?
- Yes! Participants can join a video conference within Safari or using our mobile app.
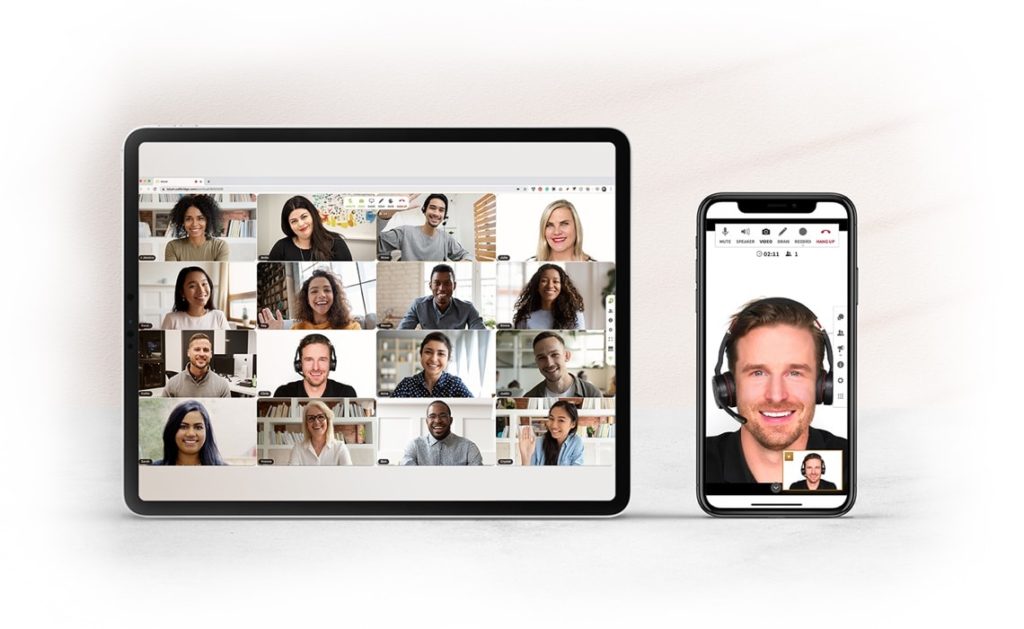
Note: iOS 13 is required for video to be available. With devices running iOS 12 participants can still share their audio and of course hear other participants, however video will not be available.
How Do I Share My Screen With Others?
Our screen sharing service works right inside your browser using WebRTC technology. There is nothing to download and no need for your participants to register anywhere in order to view your screen or shared documents.
- Ensure you have Google Chrome, Safari, Firefox or one of our Desktop Apps installed
- Windows, Mac or Linux computer required
- Join your Online Meeting Room
- Click ‘Start’ from your account dashboard in Chrome or the App; OR
- Paste your meeting room link in your Chrome browser
- Click the ‘SHARE. button at the top centre of your Online Meeting Room
- Older browsers will require an extension to be installed. Click ‘Add Extension’ and follow the instructions
- Choose what you want to share
- Entire Desktop – best for PowerPoint slide decks
- One Application – useful if you want to ensure viewers only see one specific document
- A Google Chrome tab – easiest for sharing a website in Chrome
- Exit Screen Sharing
- Click the ‘SHARE’ button at the top centre of your Online Meeting Room; OR
- Click ‘Stop Sharing Screen’ in the centre or bottom of your online meeting room
It is also possible to upload a document to present via the chat box on the right hand side. This is the best option for smaller groups and animated PowerPoint presentations.
Participants: For participants to be able to view your shared screen, they only need to call in via their browser as they would for a video call. You can find detailed instructions for participants in the article ‘How Do Participants Access My Video Conference?’ in the Web Conferencing section of our support site.
How Do I Get The One-Time Access Code?
For Scheduled Conferences
If you have an important call and you want to ensure it is private, just select the ‘Security Settings‘ option when scheduling your call. This option can be found at the bottom of the first ‘Schedule a conference’ page and will give you the option to randomly generate a one-time access code to be used just for that particular scheduled call.
You will also have the option to add an additional layer of security by choosing your own ‘Security Code’ just for this meeting. Callers will be prompted to enter this after the access code has been accepted. For scheduled calls, this feature can only be used in combination with the one-time access code.
The one-time access code will be sent to all invitees, along with the regular conference dial-in number/s and meeting URL. Participants will only need to enter this code instead of your regular code after calling the usual dial-in number.
**The one-time code will be active 15 minutes before the scheduled start time.
Default for all Meetings
Via the settings section in your account, select ‘Security‘, and choose ‘Use one-time access code’ and click Save. This will set ALL of your scheduled meetings to have a unique access code as your default preference.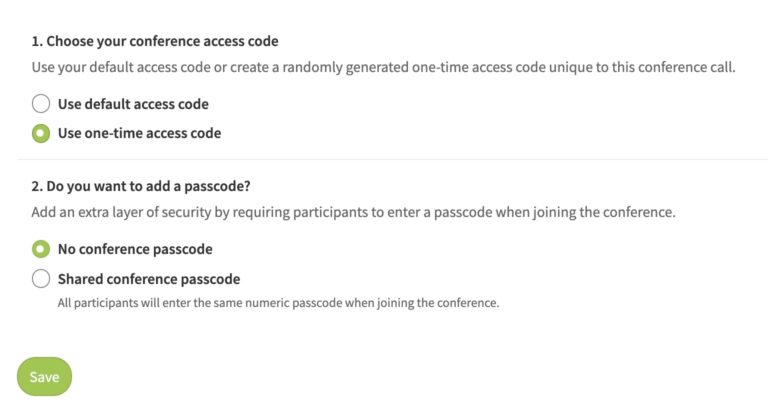
Join a video conference using the one-time security code
- Schedule a conference using the one-time access code security setting
- Conference organizer:
- Login to your account online
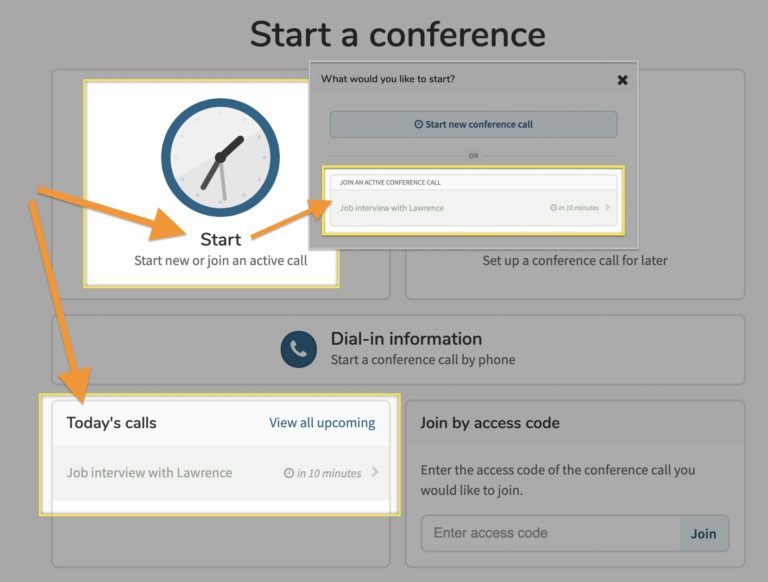
- Click ‘Start’ and ensure that you select the scheduled meeting
- OR Click on the relevant meeting in the ‘Today’s calls’ section
- OR Go to the ‘Upcoming’ section and click on the relevant conference
- Participant:
- Open the email invitation or reminder for the scheduled meeting
- Click on the meeting link in the email
- If a participant adds the meeting to their calendar, they can also click on the meeting link in their calendar to join.
Security Code
Default for all meetings
Via the settings section in your account, select ‘Security‘, enter your own preferred code that participants will be prompted to enter when calling using a phone and also via a pop-up message when they join via web. This will add another layer of security for situations where discretion and privacy are required.
How To Stream To YouTube?
STEP #1: Linking to your YouTube Account
Enable Live Streaming:
- Sign in to your YouTube account
- On your desktop computer, click the video icon at the top right of your account and select ‘Go live‘
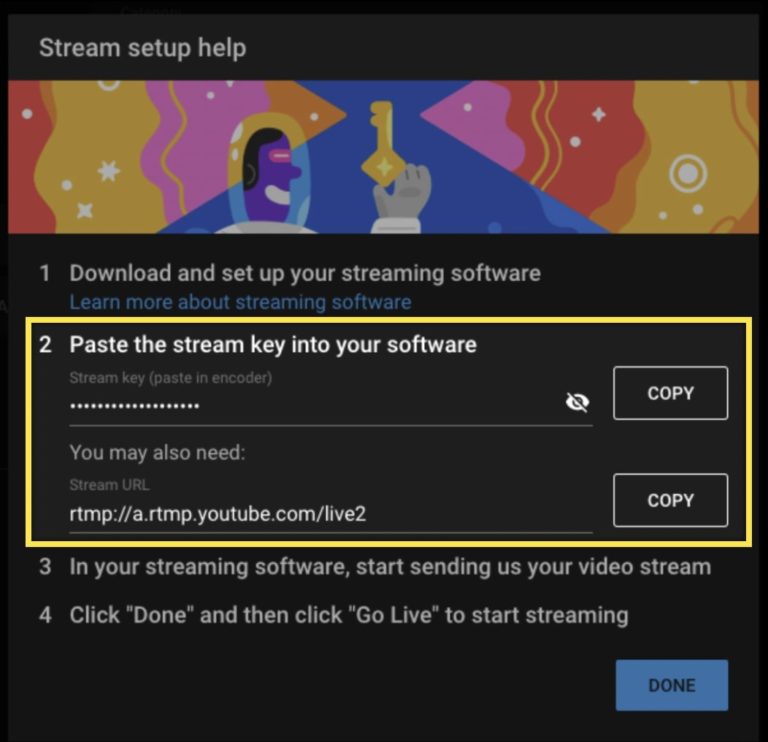
- If you haven’t already set up your YouTube account to Livestream, select ‘Stream‘ and fill out the details for your channel.
- A page will display as pictured below, copy both the stream key and stream URL.
Add your YouTube streaming details to your account:
- Go to Settings > Recording & Live Streaming > Toggle On
- Paste in your streaming key
- and share URL and click save.
- If you wish to record all meetings, but do not wish to stream ALL meetings, note that you will need to stop and restart recording in order to live stream in the online meeting room.
Note: From time to time YouTube will update these settings, so it is suggested that you confirm these details before each live streaming event.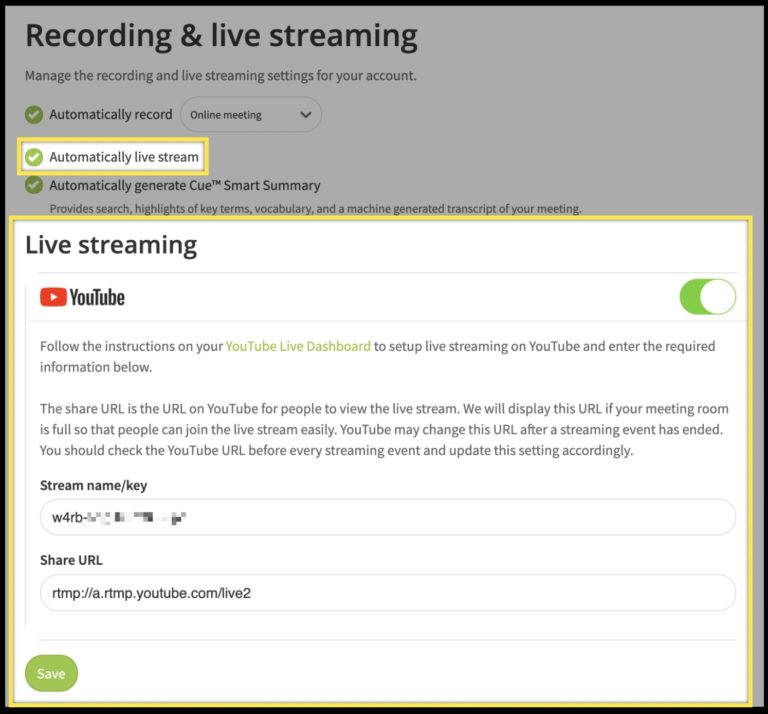
TIP: For more detailed guidance on using your YouTube account generally, please visit the YouTube support site here: support.google.com/youtube
STEP #2: Share your livestream link with participants
- youtube.com/user/[channelname]/live
- Provide the link above with your ‘channel name’
- We recommend adding it to your invitations and suggest it as an alternative option for ‘overflow’ if you are expecting you may exceed the maximum total of 100 participants.
STEP #3A: AUTO LIVE-STREAM
Start an Online Meeting from your account dashboard
AUTO live-stream: If you have enabled ‘auto-start’ within your YouTube account AND automatically live stream’ in your conference account, once a second participant joins with their audio connected and the recording has begun, live streaming will automatically be initiated. You can verify this in your YouTube account.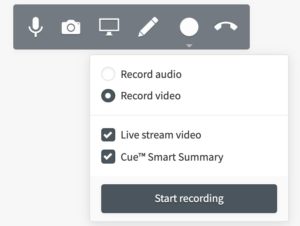
STEP #3B:MANUAL LIVE-STREAM
- Click the ‘Record’ icon in the top toolbar
- Select ‘Record Video’
- Check the box ‘Live Stream Video’. (NOTE: This will only appear if you have already entered your YouTube credentials shown in step 1)
- Click ‘Start recording’.
- Navigate to your YouTube account and select Create > Go live.
- Create a new livestream or open a scheduled livestream (ensure the streaming key is the same as entered previously in your conference account).
- Click on the blue ‘GO LIVE’ button. This will start a live stream on your YouTube Channel.
*This feature is only available to a moderator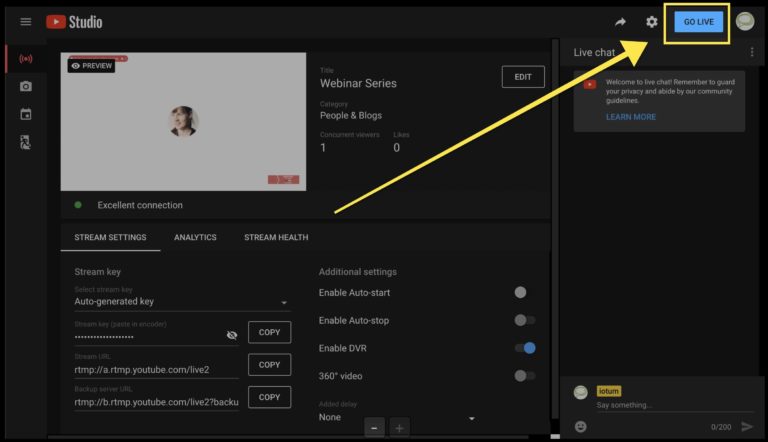
How Can I Manage My Call Online?
To manage or moderate a meeting – whether or not you are taking part in the conference – just log in to your account from your computer, tablet or smartphone phone.
To access the Online Meeting Room simply log in to your account and click on ‘START’.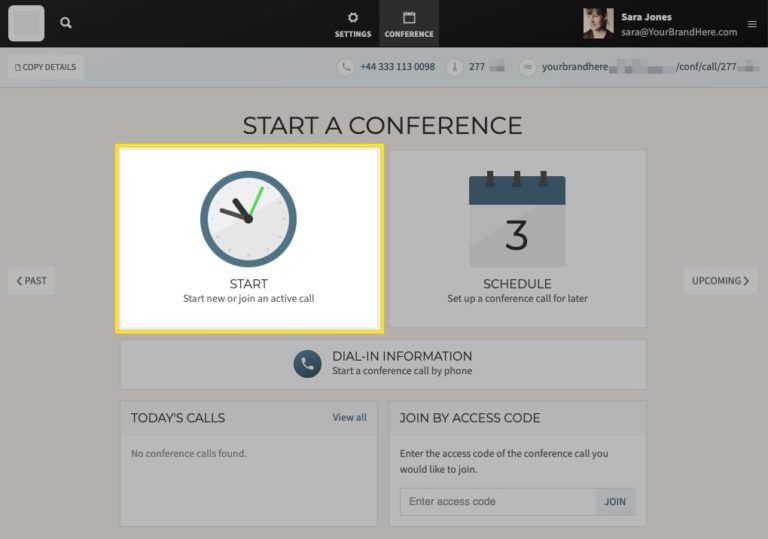
Then select your mic and webcam preferences and click ‘Join Conference‘.
To view the full participant list of who is on your call click ‘Open participant list‘ in the menu on the right hand side. You can:
- Mute or unmute ALL conference participants
- Send an email invite with your conference details
- Mute and unmute individual participants
- Make someone a moderator
- See who has raised their hand
- Remove/block someone from the conference
- See if they are on ‘view only’
- View who has left the conference already
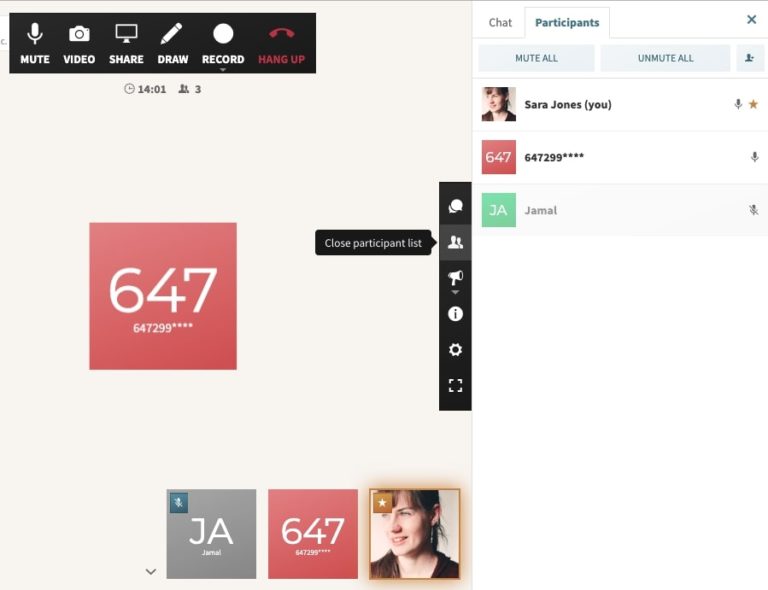
In the menu at the top of the screen you will see the following list of options.
- Clicking on ‘MUTE‘ will mute your own line, but you will still be able to hear others on the call.
- Click on ‘VIDEO‘ to activate your webcam.
- ‘SHARE‘ will activate screen sharing.
- ‘DRAW‘ will open up the whiteboard.
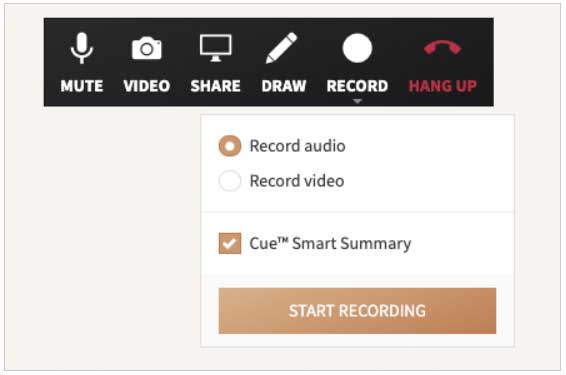
- Click on the ‘RECORD*’ button in the top menu to initiate recording of your conference. You will have the option of recording audio or your whole online meeting which includes audio and video as well as screen sharing. You will see this option change so that you can stop the recording using the same button.
- If you wish to leave the Online Meeting Room and/or end the entire conference, click on ‘HANG UP*‘.
- *Only moderators can end a meeting or initiate recording.
Hovering over a tile in the main window will be given the option to mute/unmute, pin a person’s tile or disconnect the caller.
Note: the max number of tiles is 25 in your online meeting room. The 25 tiles that display are the 24 most active speakers and the host.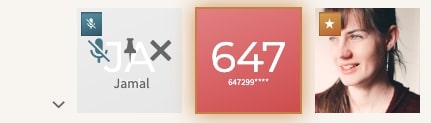
For more options during your conference, move your mouse within the meeting room window or tap on your display and a menu will appear on the right hand side.
- CHAT opens the text chat where participants can ask questions and share files.
- PARTICIPANT LIST
- CONFERENCE CONTROLS – mute and unmute everyone
- INFORMATION – all conference details, including call in numbers, access code and meeting link
- SETTINGS – Check your microphone and webcam, change your default device and LOCK the conference
- FULL SCREEN
VIDEO
How Do I Start A Video Conference?
TIP: Use a headset where possible and do a test call in advance.
START NOW
- Login to your account.
- Click ‘START’ to initiate an on-demand conference to begin right away.
- Select ‘INTERNET’ on the next screen to initiate your conference via computer.
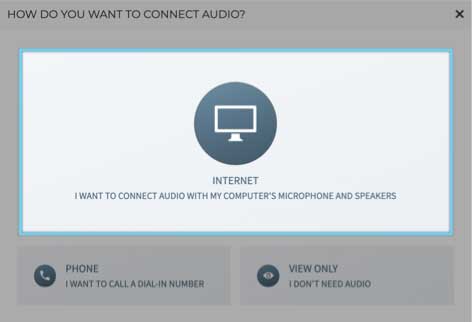
- Online Meeting Room. The first time you do this you will be prompted to “allow” your system to access your microphone.The first caller in a video conference will hear hold music. Once at least one other participant arrives this music will stop and you will hear each other.
- To activate your webcam, click on ‘VIDEO’
- To share your screen, click on ‘SHARE
How Do I Record My Video Conference?
Make sure you have logged into your account before joining the conference.
- The recording button is located within the Menu at the top of your Online Meeting Room.
- Choose if you want to record audio only or record video. By selecting video your recording will include your video feed and screen sharing as well as the audio.
- To start or pause a recording – simply click on ‘Record’.
Note: All conference calls that are recorded can be automatically transcribed after each call so you have a detailed transcription of your meeting. This can be found in your past conferences tab along with your recordings. See the ‘Features’ section for more detailed information about ‘CUE Smart Summary’.